When the power goes out, the hum of a reliable generator can be the most comforting sound, transforming a blackout from a crisis into a mere inconvenience. Keeping your essential systems running – from the refrigerator protecting your food to vital medical equipment – is paramount. But connecting a generator to your home isn't as simple as plugging in a lamp; it requires careful planning, proper equipment, and a deep understanding of safety protocols to ensure you’re protecting your family and your property.
This Super Pillar hub is designed to be your comprehensive guide, cutting through the jargon to give you a clear, human-first roadmap for safely and effectively hooking up a generator to your house. We'll walk you through everything from understanding your power needs to the critical steps of installation and operation, ensuring you're well-prepared for any outage.
Preparing for Power: Understanding Your Needs and Local Rules
Before you even think about buying a generator or plugging anything in, the most crucial step is preparation. This involves understanding what you truly need to power and navigating the essential legal and safety requirements in your area.
Pinpointing Your Power Priorities
The first question to ask yourself isn't "how big a generator do I need?" but rather, "what can I absolutely not live without when the power is out?" Essential items typically include your refrigerator, some lighting circuits, medical equipment, and perhaps a small fan or television. High-power appliances like electric stoves, central air conditioning, or clothes dryers are usually beyond the scope of typical portable generators and might require a much larger, often permanently installed, standby unit.
To accurately determine your needs, list all the devices you intend to power and find their wattage. Remember that some appliances, like refrigerators, have a higher "starting wattage" than their running wattage. A petrol-driven generator with a rated power of about 3500W, for example, is often sufficient for basic lighting, a TV, fans, and a fridge or freezer. For a deeper dive into sizing your generator and exploring the different types available, make sure to read our guide on Generator types and power needs.
The Non-Negotiable: Local Regulations and Professional Expertise
This cannot be stressed enough: always contact your local Department of Labor and Industries, Planning Department, or Power Company for regulations, permits, and the legal wiring system required in your area. What might be permissible in one town could be illegal – and dangerous – in another. Unprofessional installation carries severe risks, including injury, electrocution, fire, potential insurance claim disputes, and heavy fines. For any wiring systems or inlet box hookups, professional installation by a licensed electrician is not just recommended, it's often legally mandated and always the safest route.
The Foundation of Safety: Choosing the Right Connection Method
Connecting a generator directly to your home's electrical system requires a failsafe mechanism to prevent "backfeeding" – sending electricity back into the utility grid. Backfeeding can be lethal for utility workers trying to restore power, and it can also severely damage your generator and home appliances. This is why specialized connection methods are not just conveniences; they are critical safety devices.
Manual Transfer Switch: The Safest & Most Compliant Path
The manual transfer switch is widely considered the safest and often the only guaranteed legal option for connecting a portable generator to your home's electrical panel. Installed by a professional between your electrical panel and a dedicated power inlet, it allows you to safely switch your home's power source from the utility grid to your generator.
Here's why it's the preferred choice:
- Absolute Safety: It physically isolates your home from the utility grid, eliminating the risk of backfeeding.
- Circuit Selection: You preselect specific circuits, which helps prevent overloading your generator.
- Ease of Use: Once installed, operating it is straightforward, requiring fewer monitoring needs during an outage.
- Professional Installation: Always requires a licensed electrician, ensuring compliance and peace of mind.
While the cost is generally higher upfront, the safety and reliability it offers are invaluable. For an in-depth look at this essential component, including how to choose the right one for your home, our guide on Selecting and Installing a Transfer provides all the details.
Mechanical Interlock: A More Flexible (But Potentially Riskier) Option
A mechanical interlock kit is another method that fits directly into your existing electrical panel. It's designed to prevent both the utility main breaker and the generator breaker from being "ON" at the same time, thus preventing backfeeding.
However, mechanical interlocks come with important caveats:
- Legality: They are illegal in many areas, so always check local codes.
- Installation: Requires professional installation, often needing extra breaker box spaces or even a new panel, and must be approved for your specific breaker box (from the same manufacturer).
- Manual Monitoring: Offers flexible circuit selection, allowing you to power any circuit, but demands careful manual monitoring to prevent overloading your generator.
Given the potential safety concerns and varying legality, it’s crucial to understand all your options thoroughly. Explore the nuances of each method, including extension cords for minimal needs, in our detailed comparison of Choosing generator connection methods.
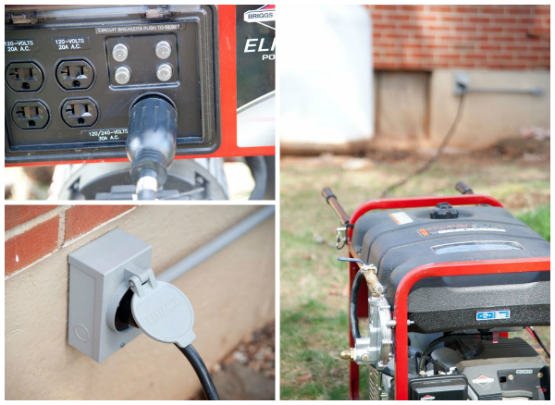
Installing Your Power Inlet Box: The Gateway
Regardless of whether you choose a transfer switch or a mechanical interlock, you will need a power inlet box. This essential component creates a safe, dedicated connection point for your generator on the exterior of your home. It houses a recessed male connector (prongs) to which your generator cord connects.
When selecting and placing your inlet box:
- Type: Bottom-mount inlets are generally preferred as they offer better weather protection compared to front-mount inlets.
- Placement: Choose a location that is easily accessible from where your generator will be placed (at least 10 feet from your home), doesn’t obstruct outdoor features, and is close to your main electrical panel to simplify wiring.
- Professional Work: Installing a power inlet box involves working with your home's electrical system and must be done by a licensed electrician to ensure safety and code compliance.
The Professional Installation Process: What to Expect
Once you've decided on a transfer switch and chosen your inlet box, the actual installation is best left to a licensed electrician. Here’s a brief overview of the steps involved in a professional transfer switch installation, so you know what to expect:
- Disconnect Utility Power: The local utility company will need to shut off power to your home's main panel and remove the meter, ensuring absolute safety for the electrician.
- Mount Transfer Switch: Your electrician will install a mounting board near your main electrical panel and securely attach the transfer switch to it.
- Connect to Electrical Panel: Flexible conduit will be run from the transfer switch to your main panel, and individual circuits (those you selected to be generator-powered) will be connected.
- Install Power Inlet Box: The power inlet box will be installed in its chosen exterior location, with conduit run to connect it to the transfer switch.
- Test the System: Before utility power is reconnected, the electrician will thoroughly test the generator and transfer switch to ensure proper operation and safe switching.
- Professional Inspection: A final inspection, often by local authorities, ensures everything meets code. This step is crucial for both safety and maintaining the validity of your home insurance.
Powering Up Safely: Operating Your Generator When Needed
With your generator properly installed and connected, the next critical phase is operating it safely during an outage. This involves strict adherence to safety protocols to protect everyone in your household.
Essential Safety Protocols: Your Non-Negotiables
Operating a generator introduces several serious risks if not handled correctly. Prioritizing safety is paramount:
- Carbon Monoxide Poisoning is Lethal:
- Distance & Direction: Always place your generator at least 10 feet (3 meters) away from your home, pointing the exhaust away from any windows, doors, or vents.
- Ventilation: Never run a generator inside your home, an attached garage, a carport, a shed, or any other enclosed or semi-enclosed space where carbon monoxide (CO) could build up.
- Detectors: Always use battery-operated carbon monoxide detectors inside your house and check their batteries regularly.
- Stable Foundation: Always place your generator on a level, stable surface to prevent it from tipping over or malfunctioning.
- Keep Clear: Never allow children or pets anywhere near an operating generator.
- No Direct Plugs: Never plug a generator directly into a wall outlet ("backfeeding") or your home’s wiring without an approved transfer switch or interlock. This is incredibly dangerous.
- Avoid Overload: Don’t start or stop the generator with other electrical devices plugged into the same socket, and never overload it beyond its rated capacity.
These are not suggestions; they are life-saving rules. For a comprehensive guide to all safety best practices, consult our Essential generator safety guide.
Step-by-Step Operation: Getting Your Generator Running
When the lights go out, follow these steps to safely power your home:
- Set Up Generator: Move your generator to its designated outdoor spot, ensuring it's at least 10 feet (3m) away from your home with exhaust directed away from all openings.
- Check Oil Level: Ensure the engine has enough oil for safe and efficient operation. Add more according to the user's manual if needed. If operating in cold weather (under 32°F / 0°C), preheat with a glow plug if your generator has one.
- Connect Power Cord: Attach the heavy-duty power cord from your home's power inlet box to the generator. Plug it in securely, select the correct voltage (if applicable), and turn the plug approximately 15 degrees to complete the connection.
- Unplug Appliances: Before starting the generator, it's wise to unplug and turn off all non-essential appliances to avoid a sudden surge when power is restored and to manage the initial load.
- Start Generator: Follow the manufacturer’s instructions. Most generators have a "START" switch or a key. Allow it to run for around 5 minutes to warm up properly.
- Switch Power: Go to your main electrical panel. First, flip off the utility main breaker. Then, turn on the generator main breaker (via your transfer switch or mechanical interlock).
- Activate Circuits: Using your transfer switch, slowly flip the pre-selected circuit breakers one by one to direct power to your desired circuits.
- If using a Mechanical Interlock: You have more flexibility but must monitor the load closely. Start with your most essential appliances and add others gradually, keeping a keen eye on your generator’s load capacity to avoid overload. Always be familiar with your generator's emergency shutdown steps.
For a more detailed, visual walkthrough of these steps, be sure to check out our practical guide on Get your generator running Set up.
Returning to Grid Power and Keeping Your Generator Ready
The outage won't last forever. Knowing how to safely transition back to utility power and keep your generator in top shape is crucial for future reliability.
Seamlessly Returning to Utility Power
When grid power is restored, reversing the process is straightforward:
- Flip Breakers Off: First, flip the individual circuit breakers connected to your generator to the "OFF" position, one by one.
- Turn Off Generator: Switch the generator's main breaker (on your transfer switch or interlock) to the "OFF" position.
- Turn Off Generator Engine: Follow your generator's manufacturer instructions to safely shut down its engine.
- Disconnect: Unplug the power cord from the generator and store it properly.
- Restore Utility Power: Go back to your main electrical panel and flip the utility main breaker back to the "ON" position.
Maintaining Your Generator for Long-Term Reliability
A generator is an investment in peace of mind, but only if it's ready when you need it. Regular maintenance is key:
- Oil Changes: Perform oil changes as recommended by the manufacturer, typically after a certain number of hours or annually.
- Air Filters: Check and replace air filters as needed to ensure clean airflow to the engine.
- Monthly Testing: Run your generator under a small load for 15-30 minutes each month to ensure it starts easily and runs properly. This also keeps the carburetor from gumming up.
- Connections: Periodically double-check all electrical connections between the generator, power inlet box, and transfer switch for tightness and corrosion.
- Spark Plugs: Inspect and clean spark plugs, replacing them according to the manufacturer's schedule.
- Spare Parts: Keep essential spare parts on hand, such as oil filters, spark plugs, and fresh fuel stabilizer.
By taking these proactive steps, you ensure your generator will be a reliable lifeline, ready to spring into action whenever the unexpected happens.
Preparing for power outages is more than just owning a generator; it’s about understanding the entire process of safely integrating it into your home. By following these guidelines, prioritizing professional installation, and committing to ongoing maintenance, you'll ensure your family remains comfortable and secure, no matter what the weather or grid might bring. Stay prepared, stay safe!