In the quiet aftermath of a power outage, the hum of a generator can be a welcome sound, a beacon of normalcy in an unexpected blackout. But connecting that generator to your home's electrical system isn't as simple as plugging it into a wall. Done improperly, it can be incredibly dangerous, even deadly. That's where Selecting and Installing a Transfer Switch becomes not just a convenience, but a critical safety measure.
A transfer switch acts as the essential bridge between your home's electrical panel and your generator, providing a secure, code-compliant way to transition from utility power to backup power. It's the unsung hero that keeps the lights on, the fridge cold, and, most importantly, protects utility workers from hazardous "backfeed" – a condition where your generator's power flows back into the grid.
At a Glance: Your Guide to Transfer Switches
- Manual Control: A manual transfer switch (MTS) requires you to physically operate it, switching your home's power source from the utility grid to your generator and back again.
- Safety First: Its primary role is to prevent backfeed, ensuring generator power never reaches the utility lines.
- Know Your Needs: Accurately calculate your essential circuits' wattage to size both your generator and transfer switch correctly.
- Professional Help Highly Recommended: While DIY is possible for the experienced, a licensed electrician ensures safety, code compliance, and proper function.
- Regular Maintenance: Periodic testing and inspection are crucial for reliable operation when you need it most.
Why a Transfer Switch Matters: More Than Just an On/Off Switch
Imagine a utility worker repairing a downed power line, believing it's de-energized. If your generator is directly plugged into your home's circuits without a transfer switch, its power could "backfeed" onto the grid, energizing that line and causing severe injury or even electrocution. This is why a transfer switch isn't optional; it's a safety imperative.
Unlike automatic transfer switches (ATS) which detect outages and switch power sources automatically, a manual transfer switch gives you direct control. It's an excellent, cost-effective solution for portable generators, allowing you to selectively power only the circuits you deem essential during an outage, conserving fuel and managing your load.
Getting Ready: The Crucial Planning & Preparation
Before you even think about tools, proper planning is your most powerful asset. This isn't just about what you can power, but what you should power, and how to do it safely.
Understanding Your Power Needs
The first step in selecting the right transfer switch and generator is figuring out exactly what you want to power when the lights go out.
- Identify Your Critical Circuits: Walk through your home during daylight and consider what's absolutely essential. Think beyond just lights. Do you rely on a well pump for water? A sump pump to prevent flooding? What about your refrigerator, freezer, or a critical medical device?
- Common Critical Circuits: Refrigerator, freezer, forced air furnace (blower motor), critical lights (kitchen, living area), sump pump, garage door opener, television, specific outlets for charging phones or laptops.
- Calculate Your Wattage: This is where the rubber meets the road. You need to know the combined power draw of your selected appliances.
- Running Wattage: This is the power an appliance uses once it's already running. Add up the running wattage for all the critical circuits you identified.
- Example Running Wattages: Refrigerator: 750W; Forced air furnace: 1,100-1,500W; Incandescent lights: 60W/bulb; Sump pump: 800-1,000W; Garage door opener: 550-1,100W; Television: 300W.
- Factor in a Buffer: Multiply your total running wattage by 1.25. This gives you a safe minimum generator wattage to aim for.
- Startup/Surge Wattage: Many appliances (especially those with motors like refrigerators, furnaces, or sump pumps) require a momentary burst of much higher power to start up. This "surge wattage" can be 2-3 times their running wattage. The trick? Staggering appliance startups. Don't turn everything on at once. Start your furnace, let it run, then start the fridge, and so on. This prevents overloading your generator.
- Generator Sizing by House Size (Estimates): While circuit-specific calculation is best, here are general guidelines:
- Up to 2700 sq ft: 5-11 kW
- 2071 – 3700 sq ft: 14 – 16 kW
- 3701 – 4700 sq ft: 20 kW
- 4701 – 7000 sq ft: 42 – 47 kW
- Generator Types & Sizes:
- Portable Generators: Typically 5,000-7,500 watts, excellent for powering critical circuits via a manual transfer switch.
- Larger Stationary Generators: Often 10,000-20,000 watts (10-20 kW), can power more of your home.
- Large Standby Units: 20-40 kW and higher, often paired with automatic transfer switches for whole-home power.
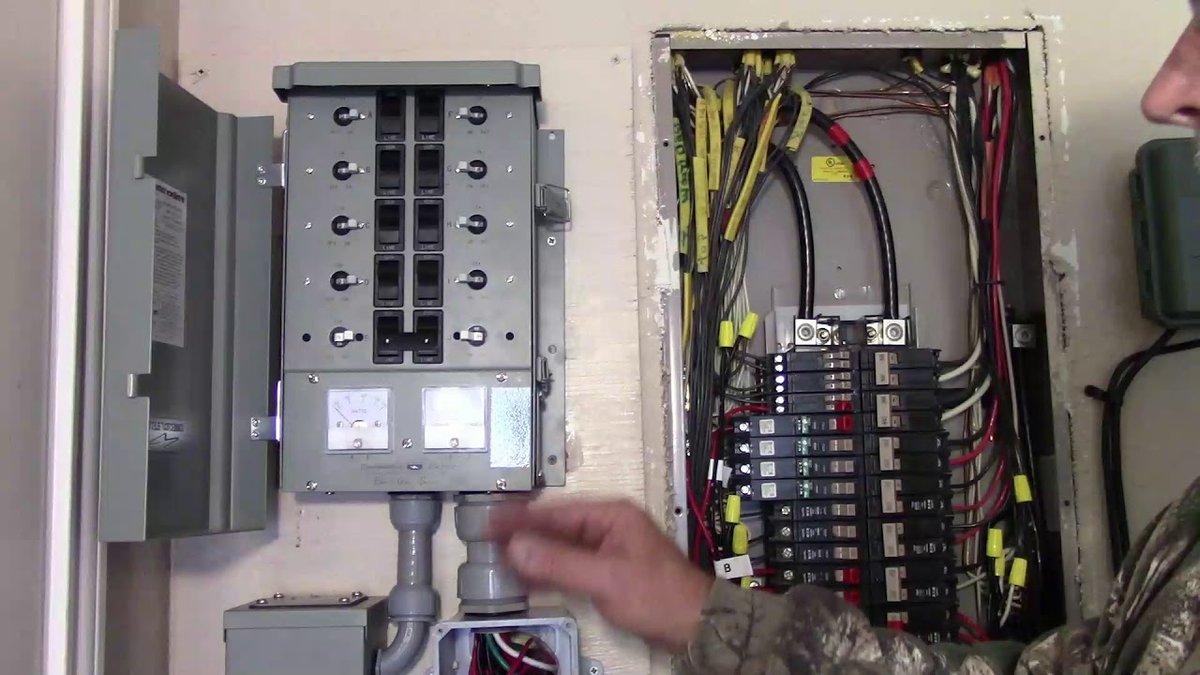
Choosing the Right Transfer Switch for Your Setup
Once you know your power needs, selecting the transfer switch becomes straightforward. It must be compatible with your generator's power output (usually measured in amps or watts), your home's total electrical load, and crucially, have enough circuits to accommodate all your identified critical needs. Look for features like individual circuit breakers within the switch and clear "LINE" (utility) and "GEN" (generator) indicators.
Tools & Materials: Your Essential Checklist
Having the right equipment on hand makes the job safer and more efficient.
- Essential Tools: Screwdrivers (various types), wire strippers, non-contact voltage tester/multimeter, drill, level, tape measure.
- Required Materials: The transfer switch kit itself, appropriate electrical wires (check local codes for gauge, often 10- or 12-gauge depending on circuit amperage), flexible electrical conduit (matching knockout size), conduit connectors, wire nuts/connectors, mounting hardware (screws, anchors), electrical tape.
Strategic Placement: Where to Install Your Switch
The location of your transfer switch is important for safety and convenience.
- Ideal Spot: Choose a dry, dust-free, and easily accessible location, typically near your main electrical panel.
- Clearance: Ensure there's adequate working space around the switch for installation and future maintenance. Avoid cramped areas.
- Code Compliance: Always check your local electrical codes. Some areas have specific requirements regarding clearance, proximity to flammable materials, or outdoor installation.
Safety First: Non-Negotiable Precautions
This is, without exaggeration, the most important part of this entire guide. Working with your home's electrical system carries significant risk.
- CRITICAL: Turn Off Main Power: Locate your home's main circuit breaker (usually a large, double-pole breaker at the top of your main service panel) and switch it to the "OFF" position. This de-energizes your entire home.
- VERIFY Power is Off: Use a voltage tester or multimeter. Test multiple points within your main panel (e.g., the main lugs, various circuit breakers) to confirm no power is present. Never assume the power is off without verifying.
- Personal Protective Equipment (PPE): Wear insulated gloves, safety glasses, and non-conductive footwear.
- Local Codes & Professional Help: Strictly follow all local electrical codes. We cannot stress this enough: consult with your city or local building office to ensure compliance and safety. For many homeowners, professional installation by a licensed electrician isn't just recommended, it's often the safest, smartest, and legally required choice.
Step-by-Step: Installing Your Transfer Switch
With thorough planning and safety precautions in place, you're ready to begin the physical installation. Remember, if you feel unsure at any point, stop and call a professional.
Securely Mounting the Transfer Switch
A stable mount ensures your transfer switch remains secure and functional for years.
- Find a Strong Surface: Locate a sturdy wall surface (e.g., a stud) near your main electrical panel.
- Mark Drilling Points: Hold the transfer switch against the wall, using a level to ensure it's straight. Use a pencil to mark the precise spots for your mounting screws.
- Drill & Anchor: Drill pilot holes at your marked points. If you're drilling into drywall without a stud, use appropriate wall anchors for enhanced support.
- Fasten the Switch: Align the transfer switch with the drilled holes and securely screw it to the wall. Ensure it's firm and doesn't move or wobble.
Connecting Conduit to the Main Panel: Bridging the Gap
This conduit protects the wires running between your transfer switch and your main electrical panel.
- Remove a Knockout: On the bottom, top, or side of your main service panel, select a knockout that matches the size of the flexible conduit connector from the transfer switch. Carefully remove it.
- Feed the Wires: Gently feed the labeled wires from the transfer switch's conduit into this knockout hole. Be very careful not to nick or damage the insulation on any wires.
- Secure the Conduit: Use a locknut and, if required by code, a bushing to securely fasten the flexible conduit to the main service panel. Your transfer switch box should ideally be positioned around 18 inches from the center of the main service panel to allow sufficient working room.
The Heart of the System: Wiring the Transfer Switch (Power OFF!)
This is the most critical phase. Double-check that your main power supply is OFF and verified with a voltage tester before touching any wires inside the main panel.
- Main Panel Circuit Connections:
- For 120V Critical Circuits: For each circuit you selected, carefully remove its existing circuit breaker from the main panel. Disconnect the existing "hot" wire (usually black or red) from that breaker.
- Attach the corresponding red wire from the transfer switch circuit to the now-available terminal on the circuit breaker you just removed. Reinstall this breaker back into its slot in the main panel.
- Locate the black wire from the same transfer switch circuit. This will be the new power feed for the original circuit. Twist it together with the old circuit's feed wire (the one you disconnected from the breaker) using an appropriately sized wire connector (e.g., a yellow wire nut). Neatly tuck these wires to the edges of the box. Repeat this process for all your 120V critical circuits.
- For 240V Critical Circuits: For appliances like a forced air furnace or electric water heater, you'll use a double-pole breaker. Attach the red leads from two adjacent transfer switch circuits to the two terminals on the double-pole breaker. These two transfer switch circuits should ideally be next to each other and connected with a handle tie.
- Neutral Connection: Locate the white neutral wire from the transfer switch's conduit. Connect this wire to an available opening in the neutral bus bar (a silver-colored bar with many white wires connected) within your main service panel.
- Grounding: Find the green ground wire from the transfer switch. Connect it to an open port on the grounding bar (often a bare copper or green wire bar) in your main service panel. Alternatively, connect it to a dedicated grounding rod or metal water pipe, strictly adhering to local codes.
- Generator Connections: Inside the transfer switch, you'll find terminals specifically designed for your generator's power input.
- Connect the generator's dedicated "hot" wires (usually black and red for 240V, or just black for 120V depending on your generator and switch) to the appropriate terminals within the transfer switch.
- Connect the generator's neutral wire (white) to the neutral bar within the transfer switch.
- Ensure you use the correct cable size (gauge) to handle the generator's power load. Consult your generator's manual and local electrical codes.
- Confirm all connections are secure and tight to prevent loose connections, which can cause power loss, arcing, or fire hazards.
- Final Touches (Before Power On): Replace the main service panel cover. Inside the transfer switch box, accurately update the circuit map, clearly labeling which switch controls which household circuit. This is crucial for safe and efficient operation during an outage.
Putting It to the Test: Verifying Your Installation
Once all wiring is complete and covers are back on, it’s time to safely test your new system. This step ensures everything works as expected before an actual emergency.
- Initial Setup:
- Confirm that all individual circuit switches on the manual transfer switch are currently set to the "LINE" (utility) position.
- Crucially, ensure the main power panel breaker for your home (the one you turned off for installation) remains in the "OFF" position. This prevents any accidental backfeed during testing.
- Verify your standby or portable generator is professionally installed, fueled, and in proper working order according to its manufacturer's guidelines.
- Connect & Start Generator:
- With the generator still OFF, securely attach the power cord from the generator to the dedicated inlet on the transfer switch box. Never attach or detach the generator cord while the generator is running.
- Now, turn your standby generator ON. Allow it to run for 1-2 minutes to stabilize its output voltage and frequency.
- Switch to Generator Power:
- One by one, flip each individual circuit switch on the transfer switch box from the "LINE" position to the "GEN" (generator) position.
- Stagger the Activation: Do not engage all circuits simultaneously. This is critical to prevent generator overload, especially with high-startup-wattage appliances. Activate circuits one at a time, perhaps balancing the load by alternating between circuits on the left and right sides of the switch.
- Observe & Confirm: If your generator has onboard wattage meters, observe them as you engage each circuit to ensure you're not exceeding its capacity.
- Verify Power: Go into your home and confirm that power is flowing correctly and safely to your designated critical circuits (e.g., lights turn on, refrigerator starts). Use a voltage tester at an outlet to double-check power.
- Return to Utility Power:
- After successful testing, return all individual circuit switches on the transfer switch back to the "LINE" position. This disconnects the generator from your home's circuits.
- Shut off your generator according to its manufacturer's instructions.
- Finally, restore main utility power by turning the main circuit breaker back to the "ON" position. Allow a few moments for the system to stabilize.
- Important Reminder: Always ensure the main utility breaker is off before switching power sources to or from the generator, both during testing and during an actual outage.
This methodical testing process is a fundamental part of how to connect a generator to your house safely and ensures peace of mind.
Keeping It Running: Maintenance Best Practices
A transfer switch is a long-term investment in your home's safety and comfort. A little routine maintenance goes a long way.
- Regular Inspection: Periodically (e.g., quarterly), visually check your transfer switch. Look for any loose connections, frayed wires, or signs of wear and tear. Inspect terminals and wires for corrosion. Ensure the switch itself is clean, dry, and free from dust or debris.
- Routine Testing: At least twice a year, and ideally before hurricane season or winter storms, perform a full test. Move the switch from utility power to generator power, and then back. This confirms smooth and safe operation and helps you identify any unusual noises, resistance in the switches, or functionality issues before an actual emergency strikes.
- Immediate Replacement: If you notice any damaged parts, such as cracked housing, broken switches, or corroded terminals, replace them immediately. Do not attempt to operate a damaged transfer switch.
- Safe Wire Checks: When performing inspections, use a non-contact voltage tester to safely check for live wires, even when the system is supposed to be off.
Weighing Your Options: DIY vs. Professional Installation & Costs
You've learned the steps, but a crucial decision remains: do you tackle this yourself or call in the experts?
The Cost Factor
The typical installation cost for a manual transfer switch ranges from $500 to $1,500. This can vary significantly based on:
- Switch Type: A basic 6-circuit switch will be less than a 10- or 12-circuit model with additional features.
- Labor Rates: Electrician rates vary by region.
- Complexity: If your existing electrical panel requires significant modification or your chosen location needs extensive wiring runs, costs will increase.
- Permits: Local permits for electrical work are often required and add to the overall cost.
DIY vs. Professional: Making the Right Choice
- DIY (for the Experienced): Installing an MTS is certainly possible for individuals with substantial electrical experience, a deep understanding of household wiring, and a thorough familiarity with local electrical codes. If you're confident in your ability to work safely with live electricity, understand schematics, and troubleshoot potential issues, then DIY could be an option. However, the stakes are high.
- Professional Installation (Highly Recommended): For most homeowners, hiring a licensed electrician is not just recommended, it's often the wisest decision.
- Ensured Safety: Professionals guarantee the installation meets stringent safety standards, protecting your home and utility workers.
- Code Compliance: They are intimately familiar with local electrical codes and obtain necessary permits, ensuring your installation is legal and passes inspection.
- Warranty Protection: Professional installation often maintains the warranty of both your transfer switch and generator. Improper DIY installation can void these warranties.
- Peace of Mind: Knowing the job was done correctly by a certified expert provides invaluable peace of mind, particularly given the critical backfeed prevention function of the transfer switch.
Your Next Steps: Powering Up with Confidence
Having a manual transfer switch is a game-changer during a power outage. It transforms the anxiety of darkness into the calm assurance of reliable backup power. Whether you choose to embark on this project yourself with careful study and immense caution, or opt for the expertise of a licensed electrician, the goal remains the same: safe, efficient, and reliable power when you need it most.
Take the time to assess your needs, gather your materials, and, most importantly, prioritize safety at every single turn. When the next storm rolls in, you'll be ready to flip that switch and keep your household humming along.